Support for instructors, educators and industry team members using Integrity Advocate within Moodle. Your account manager will provide faculty training and support to ensure that everyone on your team has full visibility into the Integrity Advocate solution.
Technical Support Email – partners@integrityadvocate.com Sales Email – sales@integrityadvocate.com
Access the course that you would like to add the Integrity Advocate Block.
Select “Turn editing on” from the box near the top right of the course screen.
Click on the activity (i.e. quiz) that requires proctoring.
Click on the “+” to select “Add a block” (this may also appear as a “+ Add a block”).
Select Integrity Advocate from the list.
Note: You will only be able to enable Integrity Advocate on an activity after the Integrity Advocate block has been added to your activity homepage.
Click on the cog menu icon and then select “Configure Integrity Advocate block”
On the Configure an Integrity Advocate block page, enter in the Application ID and the API Key, then click “Save changes”
In the Integrity Advocate block on the right of the page, click on “Module Overview”
On the Integrity Advocate Module Overview page, access the Activities tab and check off the “Enable Integrity Advocate” box.
Select the rules level from the drop down menu under “Rules”.
Click the Select Rules button to confirm the individual rules that will be applied to the given activity. Click“Submit” when done.
Once rules are saved, return to the main course page and turn off editing.
When a bypass code is entered during the Integrity Advocate pre-check process, the Learner will be allowed to proceed without IA running during the test session.
Once the learner is prompted for the Integrity Advocate pre-check, click the gear icon located in the upperright corner.
Manually enter the bypass code for the learner, then click the green checkmark to continue. The Learner may begin the exam.
To request/delete bypass codes contact partners@integrityadvocate.com.
From within the IA Widget on the course homepage click the Participants tab.
Click on the exam being reviewed.
Click the Select Status dropdown and filter on Invalid (Rules) or Invalid IDs.
There are four possible statuses that you will see in the Integrity Advocate widget under the Participants tab.
In Progress. If there is an End date and time, the session is being reviewed. If the end date and time is “Incomplete”, the participant is currently taking the quiz, or they began the session but left without completing (ie, closed the browser without closing the Integrity Advocate session).
Valid. The session is complete with no violations.
Invalid (ID). The participant has submitted an unreadable or non-approved ID and needs to resubmit. Integrity Advocate emails the Learner directly asking for them to resubmit their ID. This link can also be found in the Participant’s tab. Search for the participant and under Status, select Resubmit ID. This will provide a link to send to the participant.
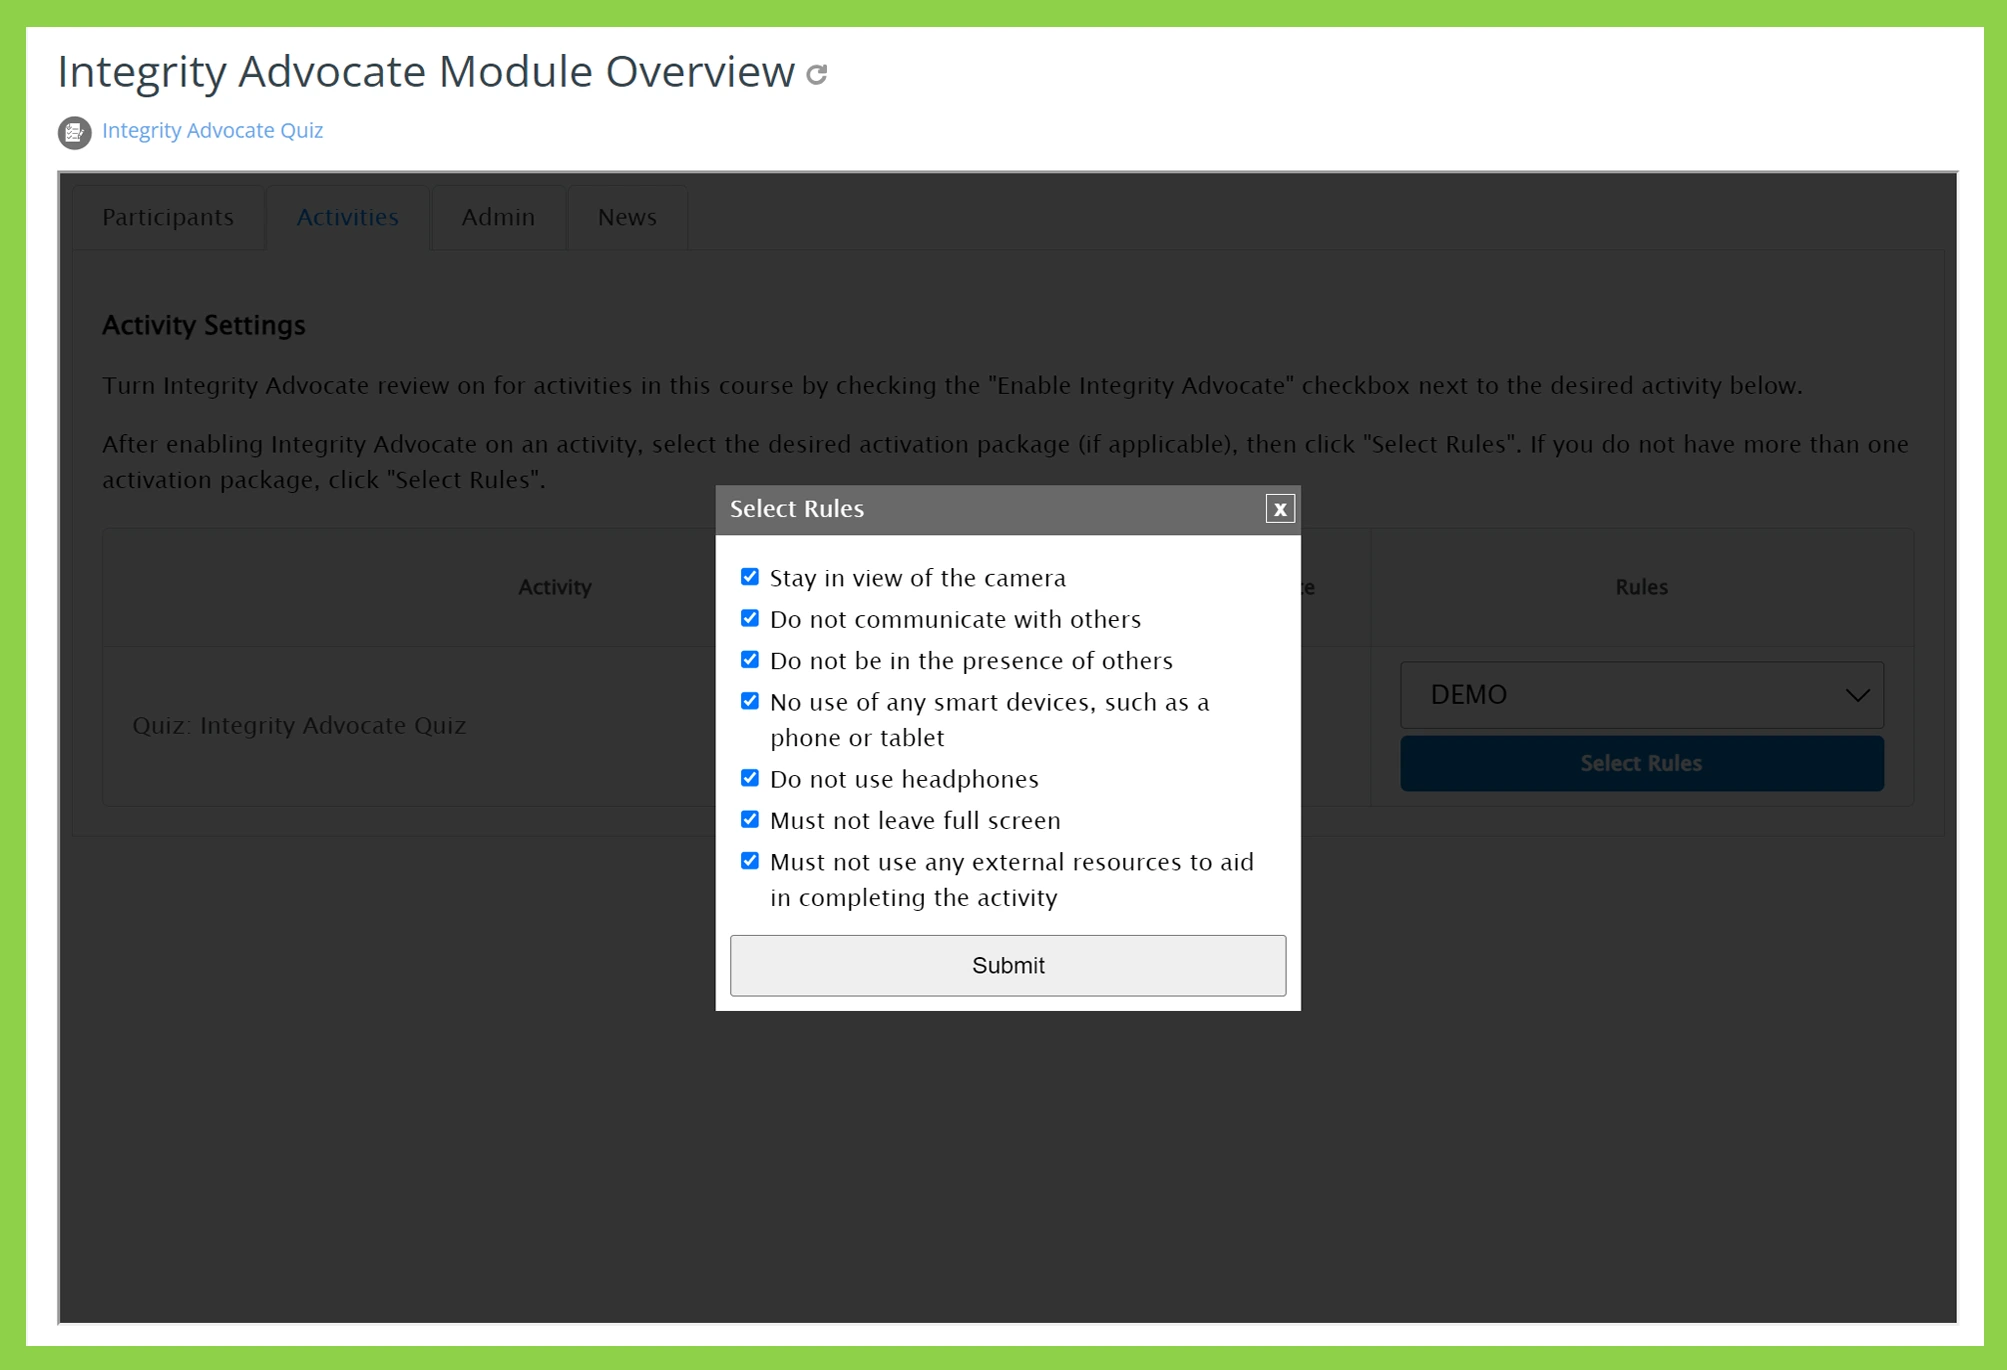
Invalid (Rules). There has been a violation of the selected rules for the quiz.
Review Status for Learner attempt and Invalid statuses by clicking the participant’s name to access Learner images taken during quiz.
Note: Images will appear with notes indicating potential flags.
You can Override a Valid, Invalid (ID), or Invalid (Rules) status from the Integrity Advocate widget.
Find the participant in the Participants tab, then click Override under their current status.
Click the dropdown under Status Override, select the new status, and enter a reason. Click Submit.
Click OK when prompted.
Click Override again to see the reason and who made the change. Note: If the Use Grade Item is selected in the widget for the quiz, click Update Grade to update the Gradebook for the Learner attempt. The IA Status column associated with the quiz will update.
Access the Admin menu by clicking the icon with the three horizontal lines from the top left of the screen.
Select Site Administration
Choose Users from the top, horizontal menu, then scroll down to Permissions and click Define roles.
Access Student role.
Click Edit.
Scroll down the Editing role ‘Student’ page to find and click Show advanced.
Scroll and locate or Search for “block/integrityadvocate:selfview” (Ctrl + f to search the page).
Unclick the Allow checkbox to the right of View own Integrity Advocate results.
Scroll down to the bottom of the page and select “Save”.
The quiz must have all the questions on a single page in the designer. The plugin just provides a different view of the questions.
This plugin must be added to each activity page where the One Page Paginate plugin is required.
Access the Admin menu by clicking the icon with the three horizontal lines from the top left of the screen (all Moodle account may be personalized, so screenshots may not be an exact match for every instance of Moodle).
Select Site Administration
Select Plugins from the top, horizontal menu, then click “Install Plugins”
Drag and drop the downloaded file into the designated box on the Moodle screen and select Install plugin from the ZIP file.
Navigate to the course for the quiz in which the pagination plugin is to be added.
Select “Turn editing on” from the box near the top, right of the course screen.
Click on the activity (e.g.: quiz) within that course that needs the pagination plugin.
Click on the “+” to select “Add a block” (this may also appear as a “+ Add a block”, depending on how Moodle has been personalized).
Note: User permission settings may affect whether or not an Admin is able to see the “Add a block” option.
From the listing that pops up, select “One Page Paginate”.
The One Page Paginate block should now appear on the right side of the page. Click on the cog menu icon and then select “Configure One Page Paginate block“.
On the Configuring a One Page Paginate block page, you can select up to 50 questions from the “Show this many questions at a time” option.